Step-by-Step Instructions for No-Knead Dutch Oven Bread:
1️⃣ Mix the Dough:
✔ In a large bowl, whisk together flour, salt, and instant yeast.
✔ Pour in warm water and stir with a spoon or spatula until a shaggy dough forms.
✔ No need to knead—just make sure all flour is hydrated.
2️⃣ Let It Rise:
✔ Cover the bowl tightly with plastic wrap or a lid.
✔ Let the dough rise at room temperature for 12–18 hours.
✔ The dough should be bubbly, risen, and slightly domed.
3️⃣ Preheat the Oven:
✔ Place a Dutch oven (with lid) into your oven and preheat to 450°F (232°C).
✔ Let it heat for at least 30 minutes before baking—this creates a crisp crust!
4️⃣ Shape & Bake:
✔ Carefully remove the hot Dutch oven.
✔ Sprinkle a bit of flour in the bottom to prevent sticking.
✔ Gently pour or shape the dough into the pot—don’t worry if it looks rustic!
✔ Cover and bake for 30 minutes.
5️⃣ Finish Uncovered:
✔ Remove the lid and bake for another 15–20 minutes, until the crust is deep golden brown.
✔ Lift the bread out carefully and transfer to a wire rack to cool completely before slicing.
Quick Snapshot:
- Prep Time: 5 minutes
- Rise Time: 12–18 hours
- Bake Time: 45–50 minutes
- Total Time: ~13–19 hours (mostly inactive)
- Servings: 1 loaf (8–10 slices)
- Calories: ~140 kcal per slice
Pro Tips for Bread Baking Success:
- Use instant or rapid-rise yeast for best results—no proofing needed.
- Water temperature matters: Too hot can kill the yeast.
- Dough too sticky? It’s normal—resist the urge to add extra flour.
- Want a softer crust? Brush the loaf with melted butter after baking.
Why You’ll Love This Recipe:
- Foolproof: Perfect for beginners—no kneading, no special tools.
- Minimal Ingredients: Pantry staples only!
- Incredible Texture: Chewy, airy inside with a shatteringly crisp crust.
- Versatile: Great for sandwiches, soup dipping, or straight-up snacking.
FAQ About No-Knead Bread:
Can I use bread flour instead of all-purpose?
Yes! It’ll make the crumb slightly chewier.
What if I only have active dry yeast?
Dissolve it in warm water first before mixing with the flour.
Can I let it rise longer than 18 hours?
Up to 24 hours is fine—just keep it covered and cool.
Common Problems and Fixes:
Bread too flat?
Make sure your yeast is fresh and don’t overhandle the dough after rising.
Crust too hard?
Let the bread cool completely—it softens a bit as it rests.
Bottom burned?
Add a layer of parchment paper or sprinkle cornmeal/flour before baking.
Flavor Variations You Can Try:
- Herb & Garlic: Add 1 tsp dried herbs or roasted garlic to the dough.
- Cheese Crust: Sprinkle shredded cheddar or parmesan on top before the final bake.
- Olive & Rosemary: Stir in chopped olives and rosemary before rising.
- Sweet Twist: Add raisins and cinnamon for a breakfast-style loaf.
Perfect for Any Occasion:
Whether it’s Sunday brunch, a cozy soup night, or a rustic sandwich moment, this No-Knead Dutch Oven Bread brings homemade warmth to every table. Crusty, chewy, and completely crowd-pleasing!
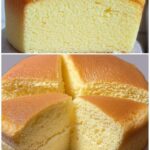
Bread-Baking Brilliance:
Golden crust. Soft, airy crumb. Effortless method. This loaf proves that good bread doesn’t need to be complicated—just delicious.
Made it? Snap a pic and tag your rustic creation—we’re all about those homemade bread moments!